Reverse Clutch
Reverse Clutch
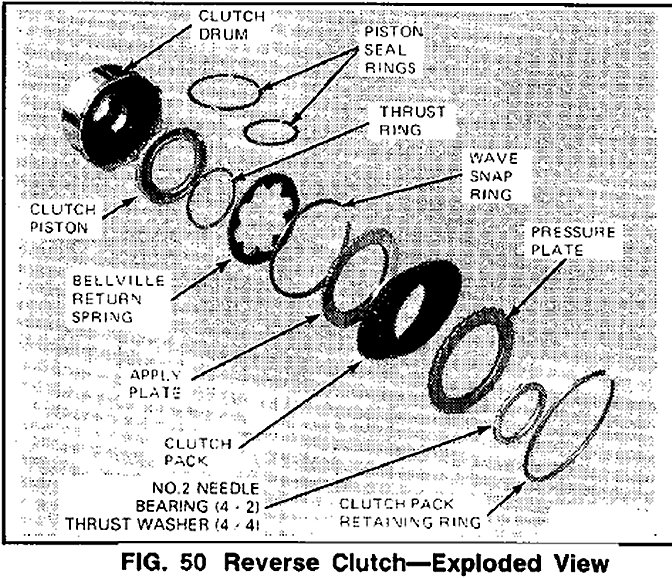
Refer to Fig. 50.
Disassembly
1. Remove No.2 needle bearing (4x2) or No.2 thrust washer (4x4).
NOTE: 4x2 applications use a needle bearing. 4x4 applications use a thrust washer.
2. Remove the clutch pack retaining ring.
3. Remove the clutch pack.
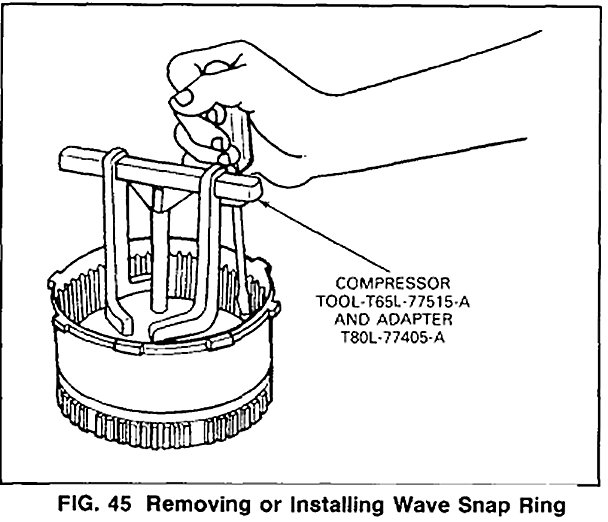
4. Remove the wave snap ring using compressor Tool T65L77515-A and adaptor Tool T80L-77405-A (Fig. 45).
5. Remove the piston return spring and the thrust ring.
6. Remove the clutch piston.
NOTE: To aid removal, apply air pressure to the drum. Block the opposite hole with finger.
Assembly
1. Install new seals on the clutch piston. Because the seal is square cut, the direction of installation is not important. Be sure ball check in piston is free.
2. Install the clutch piston as follows:
a. Coat the piston seals and clutch drum sealing area with petroleum jelly.
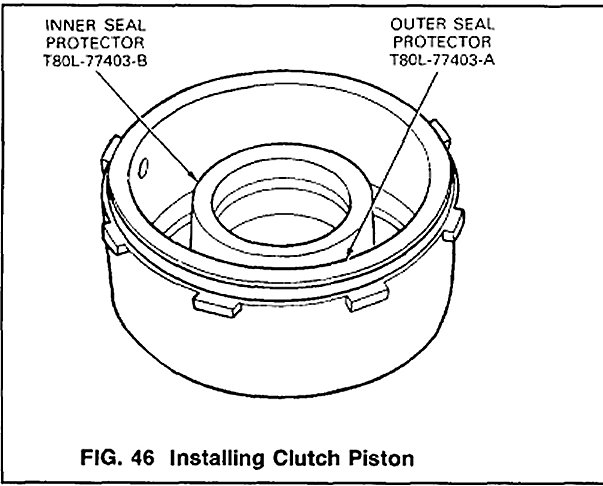
b. Install inner seal protector, Tool T8OL-77403-B and outer Seal Protector T8OL-77403-A in the clutch drum (Fig. 46).
c. Coat the piston seals, the clutch drum sealing area and the seal protector with petroleum jelly.
d. Position the piston and push it to the bottom of the drum using even thumb pressure.
3. Install the piston thrust ring and the piston return spring.
4. Install the wave snap ring (with points down) using compressor Tool T65L-77515-A and adaptor Tool T8OL-77405-A (Fig. 53).
5. Install the clutch pack. The apply plate must be installed first Note that the dished side of the plate must face the piston.
6. Install the clutch pack retaining ring and check the clearance between the ring and the pressure plate. The pressure plate should be held downward as the clearance is checked.
The clearance should be:
4.9L (300 CID) .76-1.42mm (0.030-0.056 in.)
5.0L (302 CID) EFI 1.O2mm-1.91mm (0.040-0.075 in.)
If the clearance is not within specifications, selective snap rings are available in the following
thicknesses:
0.060 to 0.064
0.074 to 0.078
0.088 to 0.092
0.102 to 0.106 inch.
Insert the correct size snap ring and recheck the clearance.
7. Check the clutch for proper operation using air pressure. The clutch should be heard and felt to apply smoothly and without leakage.
8. Install the No.2 needle bearing (4x2) or thrust washer (4x4).